This guide is for anybody who wants a stronger sign-in, and for the administrator who sets up single sign-on for a company. Every task below starts in Settings > Security. Brix always keeps one working way into your account, so no action on this page can lock you out.
What you can do
- Password reset — Send yourself an email link that sets a new password.
- Google and Microsoft — Connect either account as a second way to sign in.
- Passkeys — Sign in with your face, your fingerprint or a security key.
- Two-factor authentication — Add a 6-digit code from an authenticator app to every sign-in.
- Recovery codes — Keep ten one-time codes for the day you lose your authenticator.
- Single sign-on — Route a company email domain to your own identity provider.
- SSO-only sign-in — Drop the password once another sign-in method works.
Read what your account signs in with
- Open Settings > Security.
- Read the Password row under Sign-in methods.
- Read each row below it for a connected Google, Microsoft or single sign-on identity.
- Scroll to Passkeys for the devices that sign in without a password.
- Scroll to Two-factor authentication for the state of the second factor.
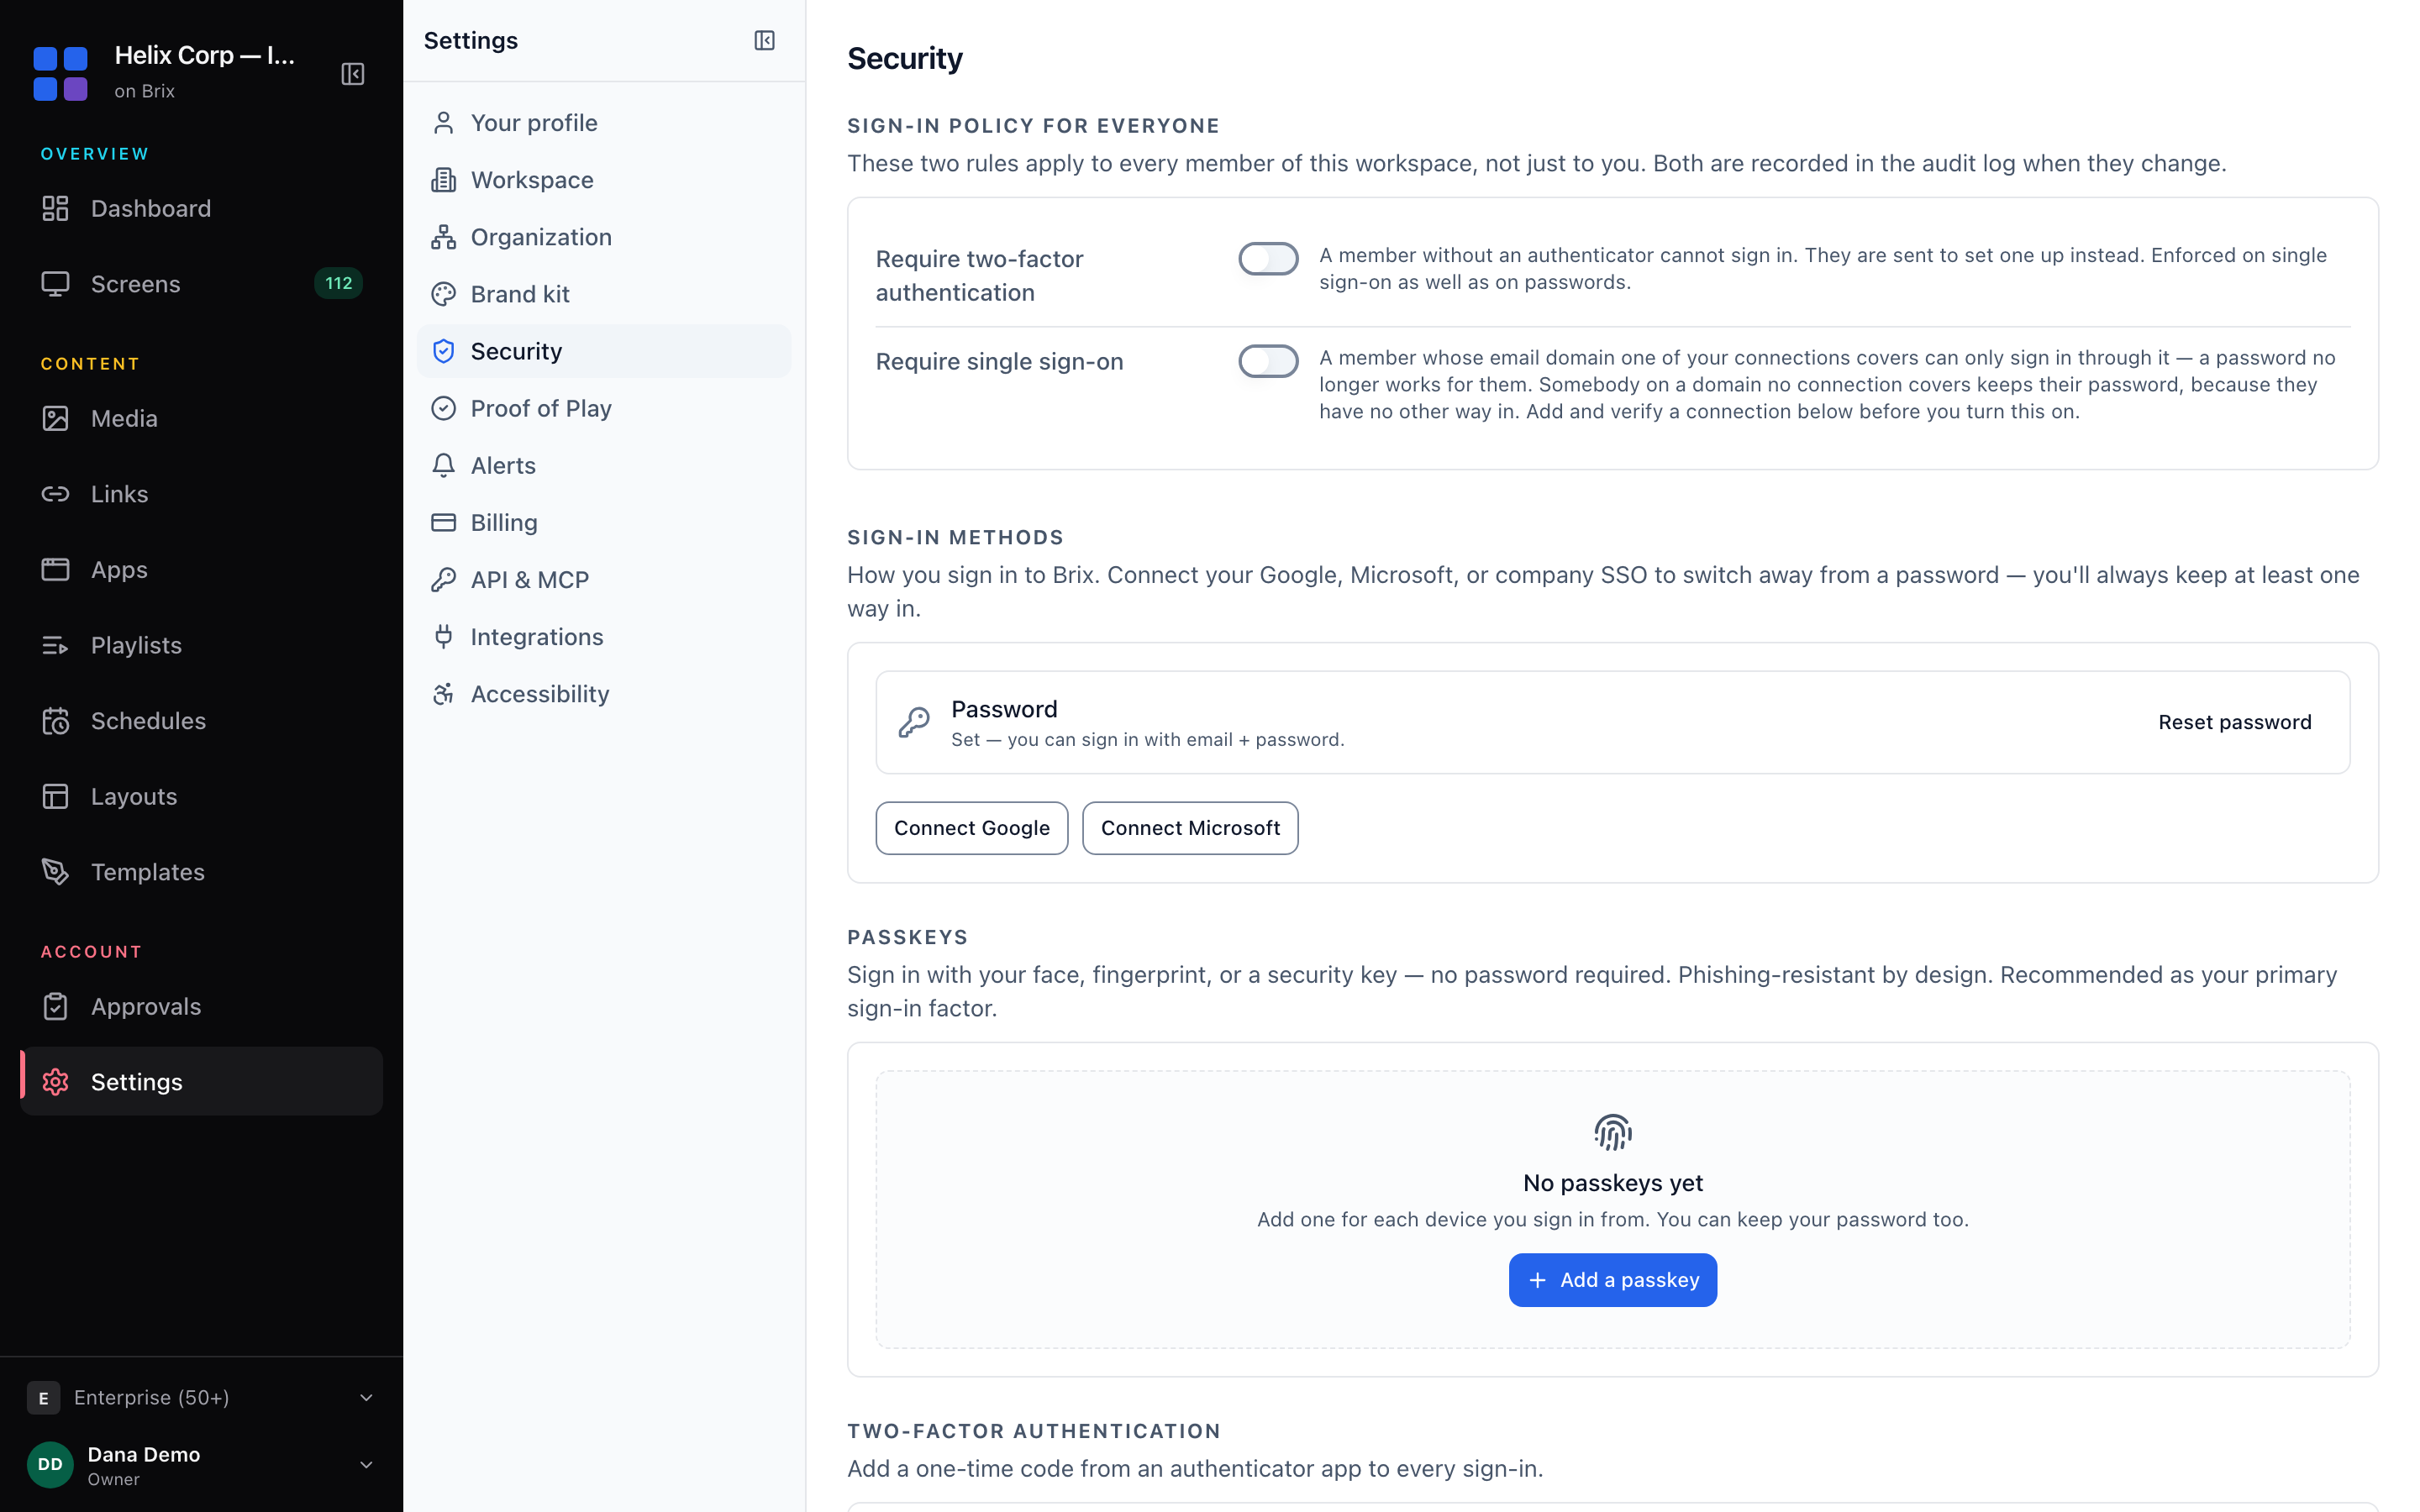
If the section cannot load, Brix shows an amber card with a Try again button. Your sign-in methods still work.
Send yourself a password reset link
- Open Settings > Security.
- Find the Password row under Sign-in methods.
- Select Reset password.
- Read the green banner that names your email address.
- Open the email from Brix.
- Follow the link in the email.
- Set a new password.
Brix has no change-password form. The emailed link is the only way to set a new password from inside the CMS.
The reset link expires after one hour. For the rest of the reset flow, see sign in and your profile.
Connect Google or Microsoft to your account
- Open Settings > Security.
- Select Connect Google or Connect Microsoft under Sign-in methods.
- Sign in at the provider.
- Wait for the browser to return to Settings > Security.
- Read the green banner that confirms the connection.
- Check the new row in the list.
Brix shows a Connect button only for a provider with no connection yet. A connected provider gets a row instead.
One Google or Microsoft account belongs to one Brix user. If somebody else already connected that account, Brix refuses the connection.
Add a passkey for this device
- Open Settings > Security.
- Scroll to Passkeys.
- Select Add a passkey.
- Type a label such as
MacBook · TouchIDinto Label (optional). - Select Create passkey.
- Approve the prompt from your browser or your device.
- Check that the new row reads
Added just now · never used.
With one passkey already in the list, the button reads Add another passkey. Add one passkey for each device you sign in from.
A passkey does not replace your password. Both keep working, and you choose one at each sign-in.
The label is free text. The label names the device in this list, and Brix never checks the label against the device.
If you cancel the browser prompt, Brix asks you to try again. Select Create passkey a second time.
A browser with no passkey support says so. Use Chrome, Safari or Edge on a device with biometrics.
Remove a passkey
- Open Settings > Security.
- Scroll to Passkeys.
- Select the trash button on the passkey row you no longer want.
- Select Remove in the confirmation dialog.
The removal takes effect at once. That device can no longer sign in.
Turn on two-factor authentication
- Open Settings > Security.
- Scroll to Two-factor authentication.
- Select Set up.
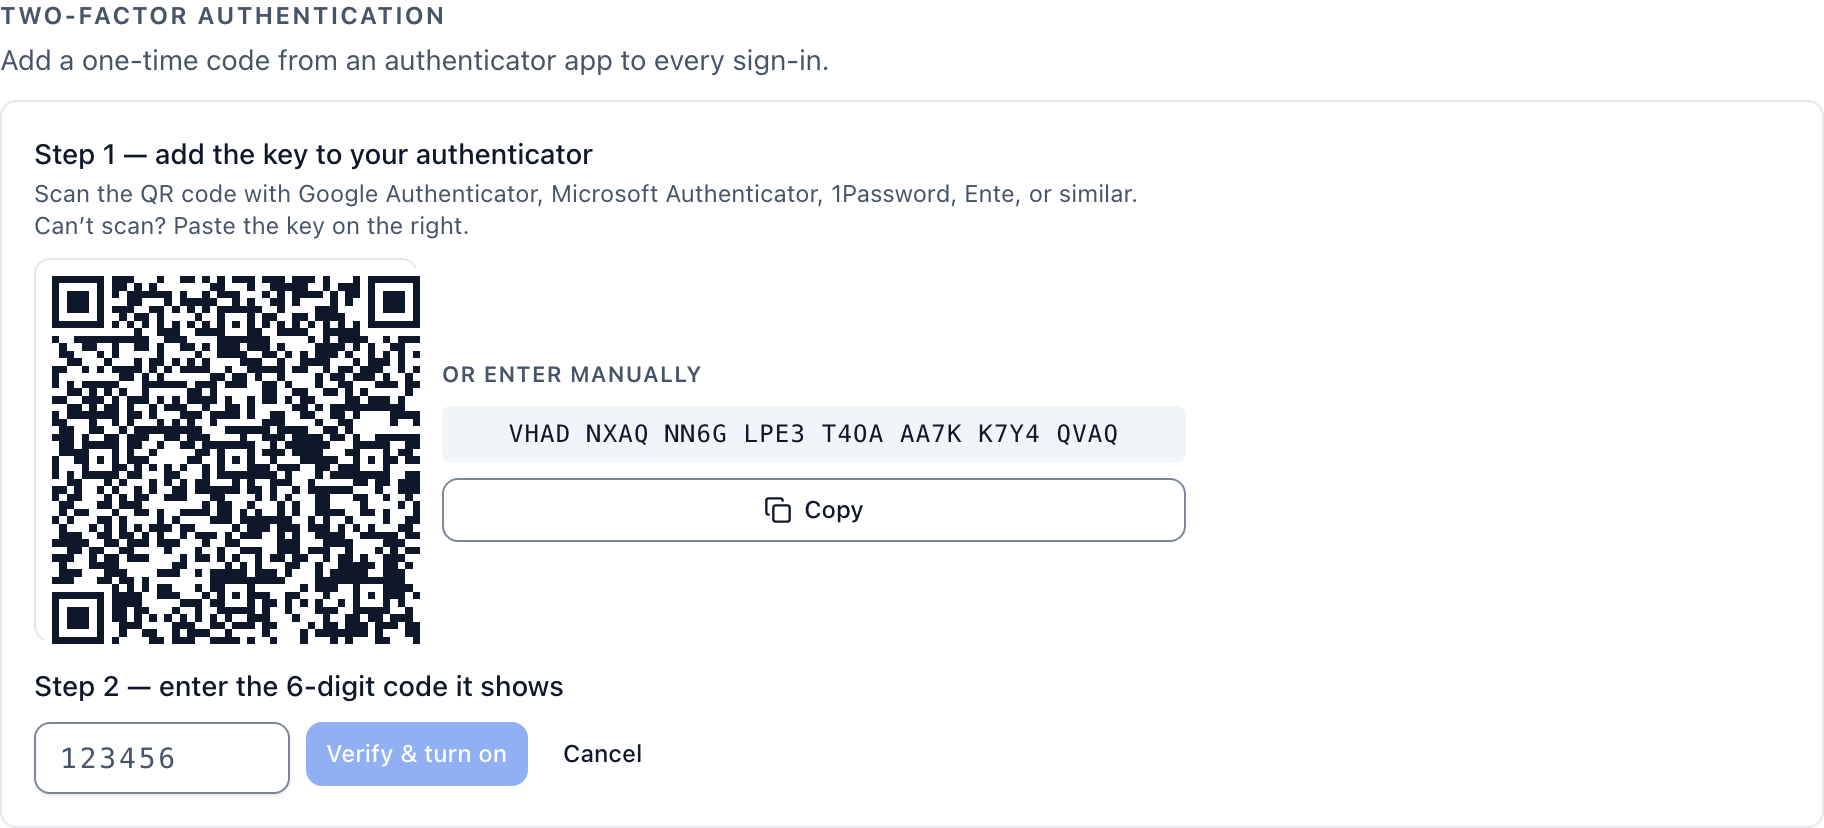
- Scan the QR code with your authenticator app.
- Or copy the key under Or enter manually into your app.
- Type the 6-digit code from your app into the Step 2 field.
- Select
Verify & turn on. - Select Copy all to copy the ten recovery codes.
- Store the recovery codes somewhere safe.
- Select
I've saved them.
Brix shows the recovery codes once, right after you turn the second factor on. Each code works one time. No page shows the codes again.
A recovery code replaces the 6-digit code at sign-in. Type a recovery code when you cannot reach your authenticator app.
Brix rejects a wrong or expired code. Wait for the next code from your app and type that one.
If the QR code does not draw, type the setup key into your app instead.
With the second factor on, the row states how many recovery codes remain.
Turn off two-factor authentication
- Open Settings > Security.
- Scroll to Two-factor authentication.
- Select Turn off.
- Type a current 6-digit code from your authenticator app.
- Select Turn off a second time to confirm.
Brix needs a current code to turn the second factor off. Without a code the section asks you for one.
Set up single sign-on for your company
A single sign-on connection routes every email address in your domains to your identity provider. Brix works with Microsoft Entra ID, Google Workspace, Okta, Auth0 and any other OIDC provider.
- Open Settings > Security.
- Scroll to Single sign-on.
- Select Add SSO connection.
- Type a name such as
Acme Single Sign-Oninto Display name. - Choose your provider in Vendor.
- Paste the issuer URL from your provider into Issuer URL.
- Select Test to check the discovery document.
- Paste the client ID from your provider app registration into Client ID.
- Paste the client secret into Client secret.
- Type your email domains into Email domains.
- Separate two or more domains with a comma.
- Leave
Just-in-time provisioningticked so Brix creates a member at first sign-in. - Leave Enabled ticked.
- Select Create connection.
- Select Copy beside Redirect URL for your IdP.
- Paste that URL into the redirect-URI field of your provider.
- Select Done.
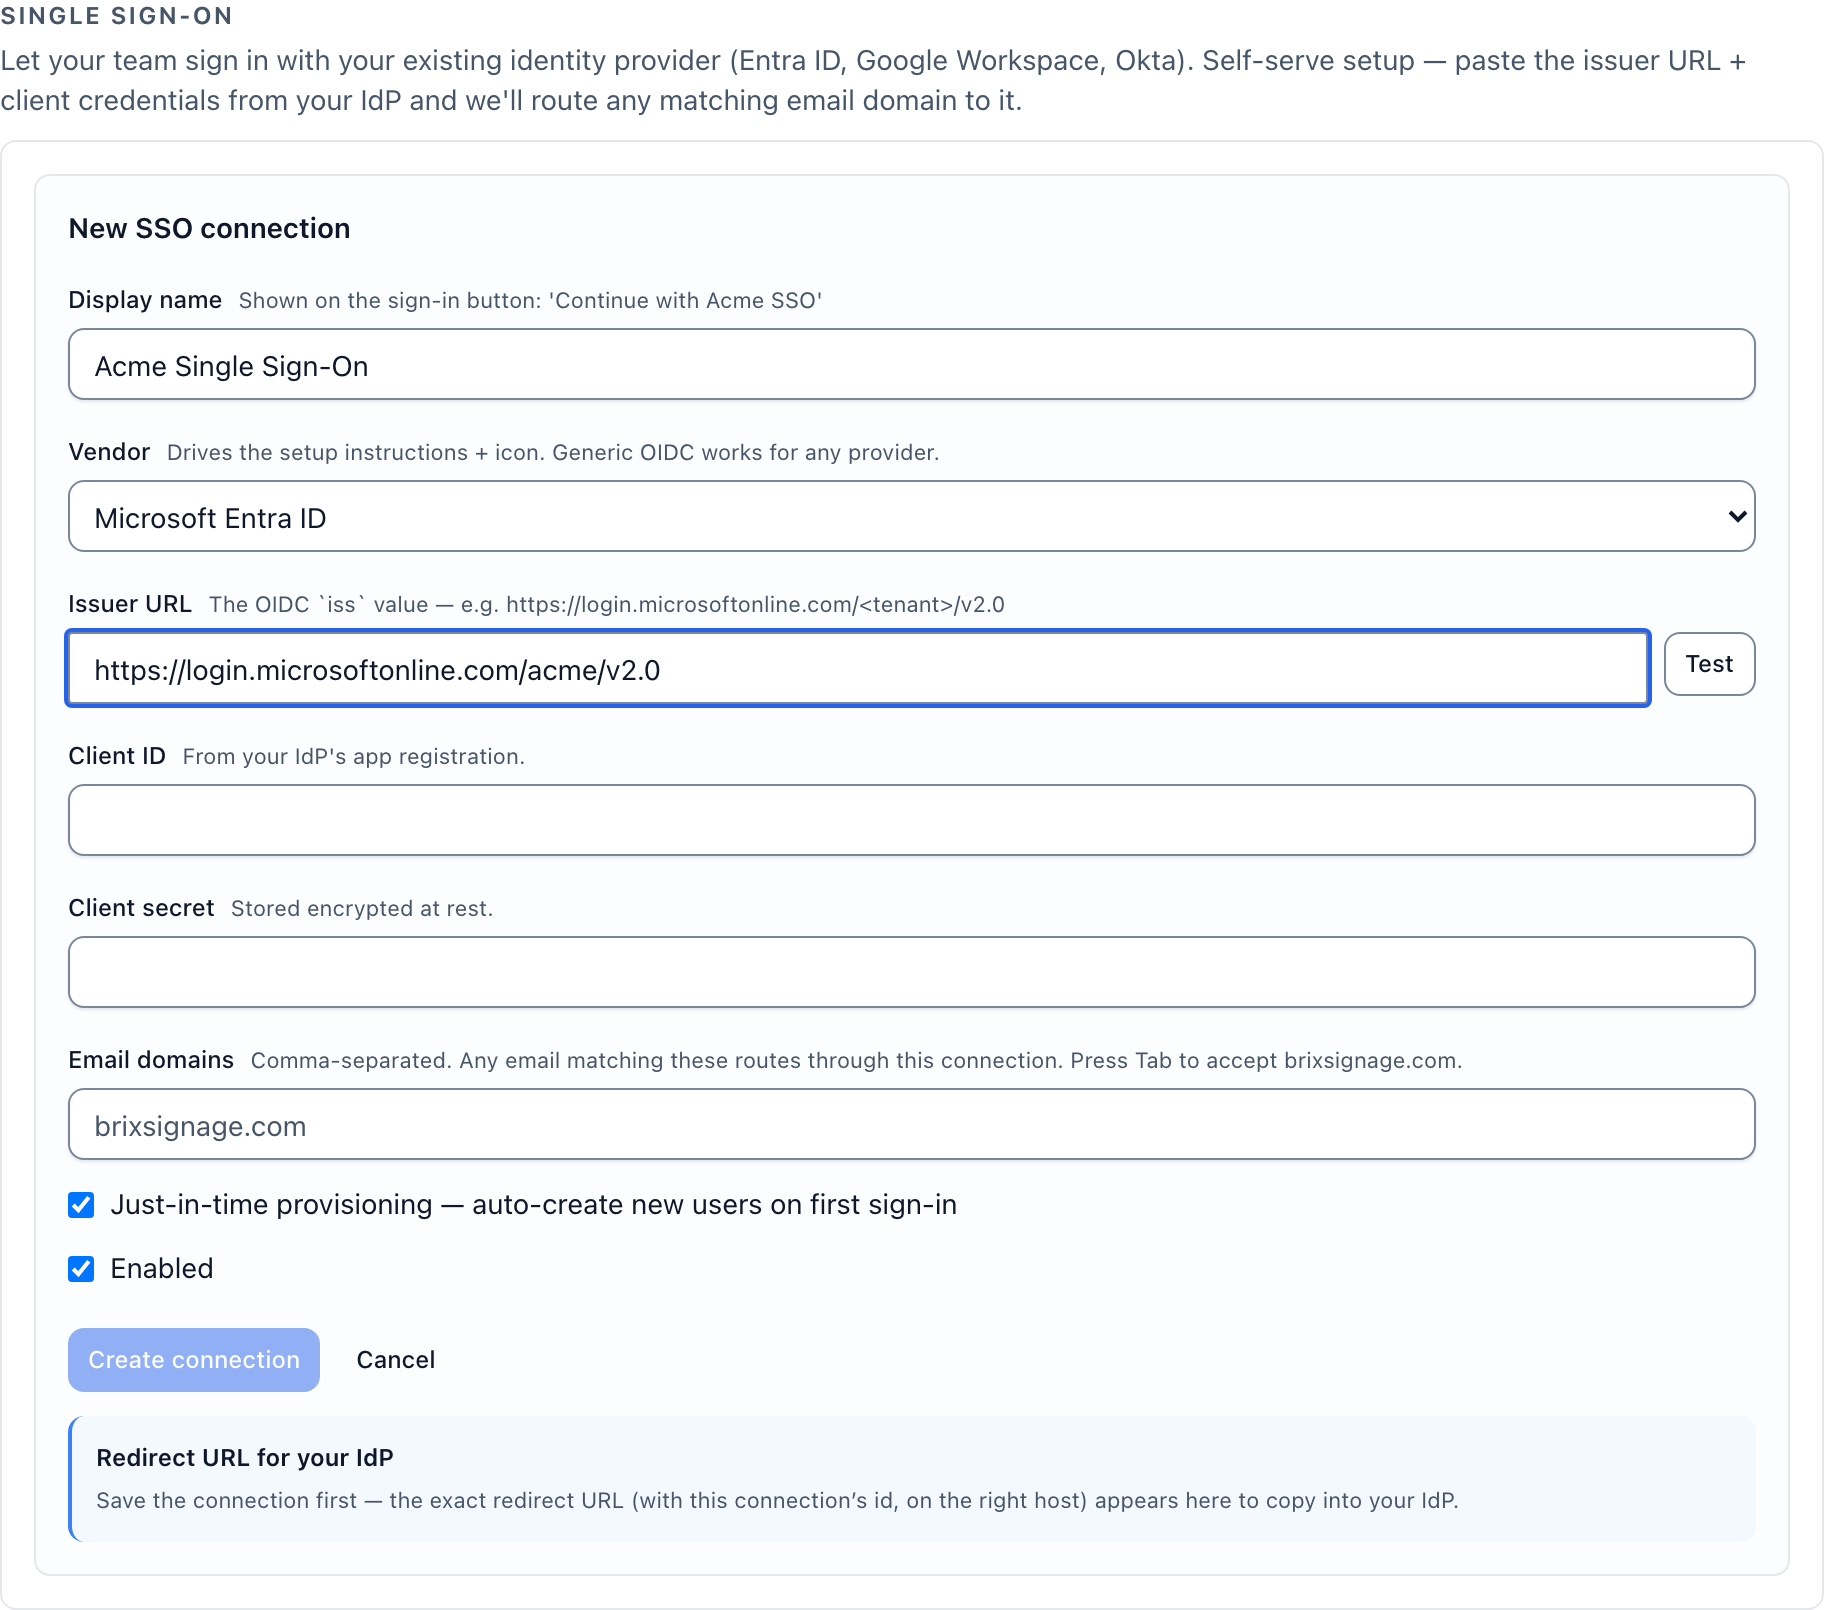
The redirect URL appears only after Brix saves the connection. Paste the URL into your provider exactly as Brix shows it, because the sign-in flow sends that same URL.
Test reads the discovery document at the issuer URL and names the authorization host it finds. A failed test names the discovery error.
Press Tab in an empty Email domains field to accept your own email domain.
Create connection stays disabled until Display name, Issuer URL, Client ID and Email domains all hold a value.
A new connection needs the client secret. Brix encrypts the secret and never shows the secret again.
Change an SSO connection
- Open Settings > Security.
- Scroll to Single sign-on.
- Select Edit on the connection row.
- Change the fields you need.
- Leave Client secret empty to keep the stored secret.
- Select Save changes.
Clear the Enabled checkbox to stop a connection without removing it. The row then reads Off.
Remove an SSO connection
- Open Settings > Security.
- Scroll to Single sign-on.
- Select the trash button on the connection row.
- Select Remove in the confirmation dialog.
Everybody in the email domains of that connection loses this way in. Give those people a password or a passkey first.
Switch your account to single sign-on only
- Add a passkey, or connect Google, Microsoft or your company provider.
- Open Settings > Security.
- Find the Password row.
- Select Use SSO only.
- Read the warning in the Switch to SSO-only? dialog.
- Select Remove password.
- Read the banner that confirms the account now holds no password.
Use SSO only stays hidden while the password is your only way in. The button appears once a passkey or a connected provider exists.
To get a password back, use Forgot password? on the sign-in page. No control on this page brings the password back.
Disconnect a linked account
- Open Settings > Security.
- Find the provider row under Sign-in methods.
- Select the trash button at the end of the row.
- Select Disconnect in the confirmation dialog.
The trash button stays disabled while that identity is your only way to sign in. The tooltip says so.
To give an integration its own credential instead of a person, see API keys and integrations. To set what each member can do, see organization, people and roles. To read who changed what, see proof of play and the audit log.